
.png)
You’ve finished the walkthrough, the home inspector packed up their tools, and now a 50-page PDF sits in your inbox. For most buyers, this moment triggers a mix of anticipation and dread. The home inspection report contains everything you need to know about your potential new house—but only if you can decode it.
This guide walks you through exactly how to read, interpret, and act on your inspection report. You’ll learn what matters most, what you can safely ignore, and how to turn a dense document into actionable insights for negotiations and future maintenance.
Key Takeaways
- Open the summary page first and scan the highest-priority defects before reading the rest of the report in detail.
- Learn the basic color codes and abbreviations (such as “S” for safety or “AE” for further evaluation) so you can quickly spot serious issues.
- Use the report to make decisions: request repairs, negotiate price credits, or walk away before your inspection contingency deadline.
- Know what a standard home inspection covers (roof, structure, electrical, plumbing, hvac system, interior) and what usually requires separate specialists.
- After you understand the report, create a simple action list: safety fixes now, major repairs soon, and long-term maintenance items.
What a Home Inspection Report Is (and Why It Matters)
A home inspection report is a written snapshot of a property’s condition on the day the inspector walked through. This document typically lands in your inbox within 24-48 hours of the on-site inspection, usually 30-60 days before closing.
Here’s what catches many buyers off guard: the report isn’t a pass/fail grade. There’s no “this home is approved” stamp at the end. Instead, you get a detailed list of observed conditions, defects, and safety concerns that the home inspector found during their examination.
Think of it as a medical checkup for the house. The doctor doesn’t tell you whether you’re “healthy enough”—they tell you what they found and what might need attention.
This document becomes your primary tool for three critical activities:
- Negotiating repairs or price adjustments with the seller
- Planning immediate fixes after closing
- Budgeting for maintenance over the next several years
The report protects your money and your peace of mind. A thorough understanding of what’s inside can mean the difference between a smart purchase and an expensive surprise.
Start with the Home Inspection Summary Page
Don’t start reading from page one. Flip to the summary first.
The first page (or first few pages) of most reports distill the major findings into a concentrated overview. Research shows that 77% of homebuyers prefer receiving a summary that provides the big picture before diving into comprehensive details.
This summary typically highlights:
- Major concerns that could affect safety, financing, or insurance
- Roof leaks, foundation cracks, unsafe wiring, or active plumbing problems
- Page references so you can jump to the detailed information on each issue
- Defect categories sorted by severity (safety, repair, monitor)
Your first task: scan this page and make a list of 5-10 items that could impact your decision or your wallet.
The summary gives you a roadmap. Once you know what the inspector flagged as most important, you can prioritize your attention when reading the full report.
Understand Color Codes and Inspector Terminology
Modern inspection reports use visual systems to help users quickly identify what needs attention. Understanding these codes saves time and reduces confusion.
Common color coding:
- Green: Satisfactory, functioning properly, in good condition
- Blue: Minor issues, cosmetic concerns, low priority
- Yellow: Moderate issues requiring attention
- Red: Major issues, safety hazards, urgent repairs needed
Standard abbreviations you’ll encounter:
- I (Inspected): The item was examined
- NI (Not Inspected): The item couldn’t be examined (blocked by furniture, inaccessible, etc.)
- NP (Not Present): The item doesn’t exist at this property
- S (Safety Concern): Immediate or potential safety hazard
- R (Repair): Requires repair to function properly
- D (Defect): Has a defect requiring repair or alteration
- AE (Additional Evaluation Recommended): Needs a specialist to assess further
- F (Functional): Operating as intended
- RR (Repair/Replace): Needs repair or full replacement
Check the legend section of your specific report. Each inspection company’s scale may differ slightly.
When you discover an item marked with S, R, or D, pay close attention. These codes point you toward the issues that matter most during negotiations.
Review Areas of Concern in Detail
Once you’ve scanned the summary and understand the coding system, it’s time to dig deeper into specific problem areas.
Use the page numbers from your summary to jump directly to each highlighted issue. On each defect page, look for:
- Photos: Visual evidence of the problem
- Inspector comments: Technical description of what’s wrong
- Location: Specific placement (for example, “north wall of basement” or “master bathroom”)
- Severity rating: How urgent the repair is
Create three simple categories as you review:
- Safety hazards: Exposed live wiring, carbon monoxide detectors missing, fire risks, structural instability
- Urgent repairs: Active roof leak, water damage spreading, foundation movement
- Future maintenance: Aging water heater from 2008, hvac system approaching end of life, worn shingles
Pay extra attention to patterns. If you see multiple moisture stains across different rooms, that’s more concerning than a single isolated stain. Repeated electrical problems throughout the house suggest systemic issues rather than one-off fixes.

Read the Entire Home Inspection Report Thoroughly
After reviewing the major concerns, don’t stop there. Read the complete report from cover to cover.
Reports typically organize findings by systems and areas:
- Exterior (siding, grading, landscaping)
- Roof (shingles, flashing, chimneys)
- Structure (foundation, walls, ceilings, floors)
- Electrical (panels, outlets, wiring)
- Plumbing (pipes, fixtures, sinks, drains)
- HVAC (heating, cooling, ventilation)
- Interior (doors, windows, fireplace)
- Attic and insulation
- Garage and carport
Don’t skip sections marked “no defect” or “satisfactory.” These sections confirm what’s working properly and reduce unnecessary worry. Knowing the roof is in good condition is just as valuable as knowing the plumbing needs work.
As you read:
- Use a highlighter or digital notes to mark anything unclear
- Note items you want to discuss with your home inspector or real estate agent
- Track the ages of major components when provided
Focus on the Home’s Core Systems
Certain systems carry the biggest financial and safety impact. These deserve your closest attention:
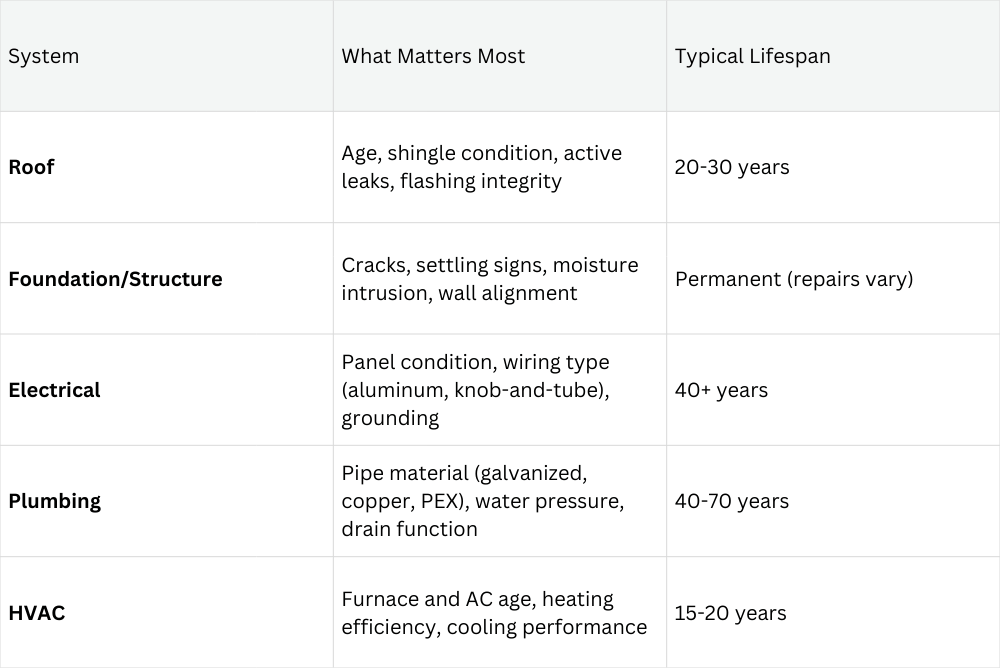
When the report mentions aluminum wiring, galvanized plumbing, or a furnace from 2005, take note. These details affect your upcoming costs and may influence insurance coverage.
Cosmetic issues like worn paint, loose interior trim, or dated light fixtures usually matter less during negotiations than core system problems.
Focus your concern and negotiation energy on items that are expensive to fix, difficult to access, or pose safety risks.

Know What’s Typically Included in a Standard Home Inspection
Most inspections follow standards of practice established by organizations like InterNACHI or ASHI. These standards define what inspectors examine and how they report findings.
A standard home inspection checklist typically covers:
- Roof surfaces, flashing, and visible structure
- Exterior siding, trim, and grading around the foundation
- Visible structural components (walls, ceilings, floors)
- Electrical panels, outlets, and accessible wiring
- Plumbing fixtures, visible piping, and water heater
- HVAC equipment including furnace and air conditioning
- Windows, doors, and weather sealing
- Attic, insulation, and ventilation
- Garage, carports, and attached structures
- Appliances (dishwasher, range, disposal)
Inspectors examine visible, accessible areas. They don’t move heavy furniture, open walls, or perform destructive testing. The report should state the inspection standards used and any limitations on the first few pages.
Understand What’s Not Included and May Need Separate Inspections
Many items fall outside a standard inspection and require specialists—especially in older homes or rural properties.
Common exclusions that may need separate services:
- Swimming pools and spas
- Septic systems
- Private wells and water quality
- Mold testing and air quality
- Radon testing
- Lead-based paint assessment
- Asbestos identification
- Termites and other wood-destroying pests
- Underground oil tanks
- Sewer line camera inspection
Ask your real estate agent or home inspector if any of these are common concerns in your location. Additional inspections come with separate fees but can protect you from large surprise costs later.
For example, discovering mold behind walls after closing costs far more than a $300 mold test before you sign the contract.
Identify Red Flags in Your Home Inspection Report
A “red flag” is an issue that could be expensive, unsafe, or difficult to insure or finance. These deserve immediate attention in your review.
Red flags to watch for:
- Foundation movement, major cracks, or structural instability
- Active roof leaks or widespread water damage
- Electrical panels with known safety issues (Federal Pacific, Zinsco)
- Evidence of mold or persistent moisture problems
- Unpermitted additions or modifications
- Fire hazards from faulty wiring or heating equipment
- Major issues with the hvac system
Language that signals serious problems:
- “Significant” or “substantial”
- “Active leak” or “ongoing moisture intrusion”
- “Structural concern”
- “Fire hazard” or “immediate safety risk”
- “Not to current safety standards”
- “Recommend evaluation by licensed contractor”
Multiple moderate issues in the same system can add up to a major concern. Five electrical defects across different rooms is more worrying than one isolated outlet problem.
Pay special attention to costly problems that compound over time—water intrusion in the foundation, for instance, doesn’t get better without intervention.
Ask Your Inspector Clarifying Questions
Your home inspector is a resource, not just a report generator. Contact them within a day or two of receiving the report while details are fresh.
Questions worth asking:
- “Can you prioritize these defects into ‘fix now,’ ‘budget soon,’ and ‘monitor’ categories?”
- “What’s the most urgent issue you found?”
- “Is this typical for homes of this age, or is it unusual?”
- “What did you mean by [specific term or recommendation]?”
- “Which items would you address first if this were your house?”
Many inspectors will provide a brief phone or video walkthrough of the report at no extra cost if you ask promptly. They want you to understand their findings.
Don’t hesitate to ask for clarification on unfamiliar terms, code references, or recommendations marked “further evaluation needed.” The inspector has seen the actual condition—the report is just their attempt to describe it.
Use the Report to Decide How to Proceed with the Purchase
Most purchase contracts include an inspection contingency period—typically 7-10 days—to review findings and respond. This is your window to act.
.png)
Discuss strategy with your real estate agent. They know local norms and can advise what’s reasonable to ask for. In competitive markets, asking for every cosmetic fix may weaken your position. In buyer’s markets, you have more leverage.
Safety issues and major system problems typically carry more weight in negotiations than worn carpet or outdated paint.
Your agent can help you draft a repair request or negotiate a price credit. Some inspection software even includes repair request builder tools that let you generate negotiation documents directly from the report.
Plan Repairs, Additional Services, and Long-Term Maintenance
Whether you negotiate repairs or handle them yourself after closing, the report becomes your roadmap.
Organize each issue by action needed:
- DIY maintenance: Caulking, weather stripping, minor fixes
- Licensed contractor: Electrical panel upgrades, roof repairs, plumbing work
- Specialist evaluation: Structural engineer for foundation concerns, sewer line camera inspection
Common follow-up services to consider:
- Electrician for panel and wiring issues
- Roofer for leaks or aging shingles
- Structural engineer for foundation movement or cracks
- Plumber for sewer line or water supply problems
- Pest inspector for termite evidence
Use the report as a document organizer for your first years of homeownership. Items marked “monitor” become your annual maintenance checklist. Items with approximate ages help you budget for eventual replacement.
Priority order after closing:
- Safety hazards (immediately)
- Active water intrusion or structural issues (within weeks)
- Major system repairs (within months)
- Cosmetic improvements (as budget allows)
Practical Tips for Reading Your Home Inspection Report Efficiently
Reading a 50-page technical document doesn’t have to be overwhelming. A few habits make the process manageable.
Set yourself up for success:
- Read on a larger screen (laptop or tablet) so photos and text display clearly
- Plan for 45-90 minutes of focused review time
- Have a notepad ready for questions and action items
Use a two-pass approach:
- First pass: Scan for high-level concerns using the summary and color codes
- Second pass: Read in detail, take notes, highlight unclear sections
Document management tips:
- Save a clean copy of the original PDF
- Create a separate marked-up copy with your highlights and comments
- Upload both to your document organizer or cloud storage for easy access later
Keep emotions in check when you see a long list of defects. Older homes almost always have several pages of notes—that’s normal, not alarming.
The report is a tool, not a verdict. Approach it with curiosity rather than anxiety.

Bottom Line: How to Truly Understand Your Home Inspection Report
The goal isn’t finding a perfect home—it’s making an informed decision about the one in front of you.
- Start with the summary to identify what matters most
- Learn the legend so you can quickly spot safety issues and major problems
- Read everything to understand both the concerns and the good news
- Ask questions when anything is unclear
- Create an action plan for negotiations now and maintenance later
Your home inspection report serves two purposes: helping you negotiate before closing, and guiding your care of the home for years afterward. Understanding what’s inside puts you in control of both.
Don’t let a long document intimidate you. With the right approach, you’ll move from confused to confident—ready to protect your investment and ensure your future home is safe and well-maintained.
How HouseFacts Can Help
After you’ve reviewed your inspection and created an action list, you still need a way to keep track of it. HouseFacts can pull key details from your inspection report and save them as part of your home’s ongoing record, helping you revisit issues as you plan repairs and maintenance.

